Sunday, March 27, 2011

Kitchen Gadget Reviews

As I mentioned in a previous post, this 1 new cupcake a week challenge gave me the excuse to buy more kitchen gadgets. Here's a review after using them.

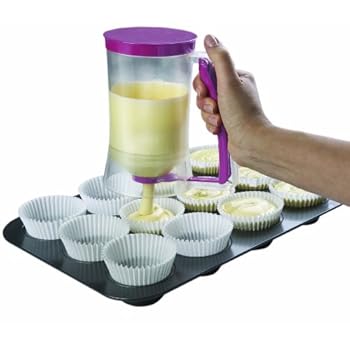
Sunbeam Cupcake Maker-AMAZING. makes 6 full size cupcakes (not like the other little bakers that make the minis) and bakes them in 10 min. No need to wait for the oven to preheat, which is a GIANT pain at my place. The oven is not fast at all. It doesn't heat up the house, so perfect for summer baking. You can use boxed recipes or from scratch. If you use a cupcake liner there is NO clean up, but if you decide to not use a liner it's non-stick :) always a plus. The one little tiny thing i don't like, is taking the cakes out. You kinda have to figure out what works for you and pop them out. but seriously. it's the cupcake's answer to a George Foreman Grill.

Chicago Metallic Baking Essentials Cupcake/Batter Dispenser-Once again, AMAZING. I will be using this for every batch I make. AND I'm going to make perfect pancakes every time now :) Also it's dishwasher safe-SCORE!

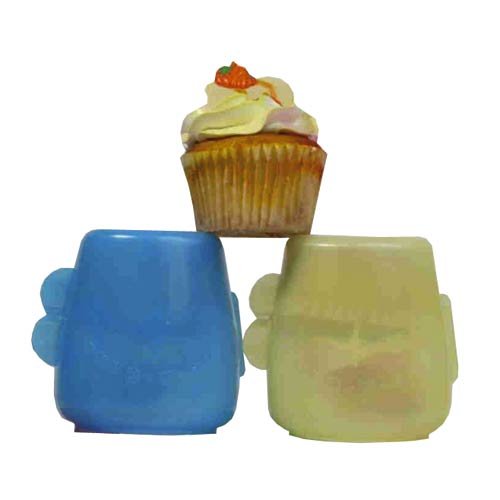
Cup-a-cake Cupcake Holder-If you have kids, they will love you for these. You can turn them upside-down and the cupcake sits perfectly still. Make some cupcakes and be able to throw one into your loved ones lunch box as an extra special surprise. Dishwasher safe as well :)

Cupcakes Week 1

The start has arrived and I'm pretty excited. I received all my baking stuff this past week and was just starring at it, dying to try it. Saturday rolled around and it was time to bust it out! I slapped on the perfect apron...
and got to work! This week I decided to try these little beauties

Looks amazing right? well, it TASTES amazing too. The cupcake is nice and moist and the flavor isn't overpowering at all. Just the smell of this will wake you right up! :) And yes, they do taste like the drink.

Caramel Macchiato Cupcakes

Espresso/Coffee Cupcake
• 2 1/2 cups all-purpose flour
• 2 teaspoons baking powder
• 1/2 teaspoon salt
• 3/4 cup strongly brewed coffee, cooled to warm
• 1/4 cup milk
• 1 tablespoon Kahlua
• 12 tablespoons unsalted butter, softened
• 1 1/3 cups sugar
• 6 large egg yolks
• 1 rounded teaspoon instant espresso

Meringue Icing
• 2 large egg white
• 2/3 cup sugar
• 3 tablespoons light corn syrup
• pinch of salt

Caramel Drizzle
• 1/4 cup sugar
• 1 1/2 tablespoon unsalted butter, cut into pieces
• 2 tablespoons heavy cream
Instructions -
1. Place rack in the middle of the oven and preheat to 350 degrees F.Place paper liners in muffin tin.
2. Stir together flour, baking powder, and salt in a small bowl and set aside. Combine coffee, milk, and Kahlua in a cup and set aside.
3. Cream butter and sugar together in the stand mixer (with the paddle attachment) on medium speed, until light and fluffy, about 5 minutes. Beat yolks in one at a time.
4. Reduce speed to low and beat in one-third of the flour mixture, then half of the liquid mixture. Scrape down sides, then beat in another third of flour mixture, then the rest of the liquid, then the remaining flour mixture. Scrape down the bowl and divide batter in half.
5. Leave half of batter as is. Stir instant espresso into the other half.

6. Drop batter into prepare cupcake liners by putting the espresso batter in as bottom half, and spooning the coffee (non-espresso) batter on top. (In picture: left is espresso batter, right is with coffee non-espresso batter on top)

7. Bake for 15-18 minutes or until toothpick comes out clean. Allow to cool in the pan for 10 minutes, before removing them to a wire rack. Cool completely before frosting.

8. Meringue Icing
*Don’t make meringue until cupcakes have cooled.
Set up a double boiler. Whisk together meringue icing ingredients in the bowl of the stand mixer by hand. Put over double boiler and whisk as it warms to about 130 degrees F (sugar dissolved). Attach to mixer and use the whisk attachment on medium speed to whip until cooled, about 5 minutes. Drop onto cupcakes immediately. (Tip: Put something under the wire rack to catch drippings.)

9. Caramel Drizzle
*Making a small amount of caramel is a little more challenging because you have a smaller window of caramelized sugar to burnt. Make sure everything is ready by the stove before starting.
Spread sugar evenly across the bottom of a heavy bottomed saucepot and put over medium-high flame. Try not to touch the sugar but watch carefully as it melts. As soon as it is browning, you can start to stir. When it looks like all of it has browned lightly, remove the pot from heat and stir in butter. Be careful because it will bubble violently. Bring it back to the flame and stir for a few seconds until smooth. Remove from the heat again and add heavy cream, again careful of violent bubbling. Stir rapidly until smooth. Set aside and allow to cool to luke warm.
Drizzle over the cupcakes.

Make-Ahead
You can make the cake part a day before and store in airtight containers after they have cooled. Once you make the icing you have to plop it on the cupcakes immediately, but once cupcakes have been completely assembled, they can be held in room temperature for several hours before service.

Sunday, March 20, 2011

I love kitchen gadgets

While I prepare myself for the cupcake challenge, I of course had to look up some gizmos and gadgets. Luckily, I had a birthday this week (never thought I would say that) and got an amazon giftcard from my brother (thanks Steve!). Off on my search I went.

I knew I need something to help me transport my cupcakes, because lord knows these CAN NOT stay in my house, or I won't fit through the door by the end of this. I knew I was going to cut down recipes to 6 cakes per recipe, so there was one for myself, one for my hubby, and then enough for us to give away at work (since we both work for small companies it worked out perfectly).
So the big cupcake holders weren't going to cut it for me. And then I needed 2 separate cases for different locations. So as I searched on Amazon, I came across the perfect solution!
Look how cute these are. you can hold them upside down and the cake still won't be ruined! Perfection! So I hit Add To Cart as fast as my little fingers could.

I am also not a clean baker. My kitchen always looks like a hurricane hit when I'm done, so I knew I needed something to help me get the batter in the tins without a giant mess. In steps this little beauty.
Perfect solution! I almost want to kiss the inventor of that little one :)

So I figured I'll buy a cupcake book and be done.
Oh, no, of course something had to catch my eye.
Look at this thing.
Yes that's right. A cupcake baker. 6 full size cupcakes in 12 minutes. How am I suppose to pass that up!? It was perfect. 6 cakes. 12 minutes. No need to heat up the whole house with the oven.
So I didn't even try to pass it up, I added it to cart right.away.

So with all these on their way, I'll be starting this challenge soon enough. I am so looking forward to this! :)

Monday, March 14, 2011

I think I might be insane...

If you've followed my blog for a while, you know at Christmas I do a 25 days of Christmas cookies challenge. A new cookie recipe every day from Dec. 1 until Christmas. Well, for some reason I had this brilliant idea to create a new challenge for myself. I miss baking. Cooking dinner isn't enough for me.
So...
Starting this week I am going to do a Cupcake Challenge. A new recipe once a week.
So if you have some good ones, send them my way!! :0) Once Christmas comes it's going to be crazy doing this with cookies for 4 weeks, but I'm up for it!

I'm excited now, but I know in a couple weeks I'm going to ask WHY WHY WHY did I do this to myself!!

Tuesday, March 8, 2011

Happy Fat Tuesday....Portuguese Style.

It's no secret that I'm Portuguese. In our culture Fat Tuesday is the day we make Malasadas.
Here's a little history of the delicious little treats
"In Madeira they eat Malasadas mainly on Terça-feira Gorda (Fat Tuesday in English) which is also the last day of the Carnival of Madeira, the reason for making malasadas was to use up all the lard and sugar in the house, in preparation for Lent (much in the same way the tradition of Pancake Day in the UK originated on Shrove Tuesday), Malasadas are sold along side the Carnival of Madeira today. This tradition was taken to Hawaii, where Shrove Tuesday is known as Malasada Day, which dates back to the days of the sugar plantations of the 19th century, the resident Catholic Portuguese (mostly from Madeira and the Azores) workers used up butter and sugar prior to Lent by making large batches of malasadas. The dough is formed and then ripped off the ball of dough and stretched out to fry on both sides.
In the United States, malasadas are cooked in many Portuguese or Portuguese descendant homes on Fat Tuesday. It is a tradition where the older children take the warm doughnuts and roll them in the sugar while the eldest woman—mother or grandmother—cooks them. Many people prefer to eat them hot. They can be reheated in the microwave, but then they will have absorbed the sugar, providing a slightly different flavor and texture."

I can remember both of my grandmother's making these. it was a long process, but now that i myself bake and cook, i see why they did it. The look on people's faces when they take their first bite is so worth it. So here's a recipe if would like to give them a whirl! :)

Malasadas

1 c. milk
1/2 c. sugar
1 tsp. salt
1 pkg. dry active yeast
1/4 c. lukewarm water
2 eggs, slightly beaten
5 c. flour

Scald milk, add sugar, salt and butter; set aside. Sprinkle yeast into lukewarm water, let stand 5 minutes. Stir until yeast is completely dissolved. Add yeast mixture to milk, which should be lukewarm. Add slightly beaten eggs. Gradually add flour, beating with wooden spoon until too stiff to beat. Remove dough to lightly floured board. Knead until smooth and elastic. Form into ball.

Lightly oil a bowl and place dough in it. Turn ball so oiled portion is on top. Cover. Place in warm area to rise until double (about 2 or 3 hours). Break, do not cut, a handful of dough at a time, stretch it with fingers. Drop by bits into hot oil. Fry until brown on all sides. Drain on paper towels and sprinkle with granulated sugar. Serve warm.